XCOM 2 is already making waves with its nerve-wrecking strategy, the in-depth customization and plenty of skill stacking. For gamers who have not played XCOM before and have just jumped into the game and need a bit of help, there are some walkthrough and beginner guides available to help you along the way.
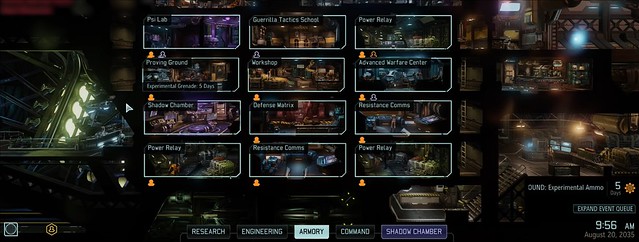
YouTuber ChristopherOdd has a great series of helpful videos that break down simple things like what each facility does in XCOM 2 and how early or late in the game you’ll want to build them, as well as cover some of the skills and abilities of the classes so you know what best suits your play-style. You can check out the video guide below covering the Avenger facilities and how you can customize, upgrade and build your base.
Psi Lab is where you train your soldiers for psychic abilities. You must select a rookie to enter the training, not a veteran. While training the soldiers you can’t take them into battle until their training is finished. If you staff an engineer in the Psi Lab, you can increase the training speed of a soldier. Additionally, upgrading the Psi Lab allows you to have two soldiers train at a single time.
Guerrilla Tactics School lets you choose a class for a soldier. You can choose skill tactics for a soldier in the Guerrilla Tactics School as well. This includes increasing abilities for Snipers and Grenadiers, as well as being able to upgrade things like Lightning Strike, where you can get additional mobility while being concealed. Squad Size I and Squad Size II allows you to add one extra person to your squad per each Squad Size level. You’ll want to get the Squad Size upgrades as soon as possible so you can bring up to six soldiers onto the battlefield at once.
Power Relay helps provide power to the Avenger. If you permanently add an engineer to the room you gain 5+ extra power. Upgrading the room allows for two engineers in the Power Relay.
Proving Ground allows you use the cores you pick up during a mission to turn them into high-end, high-tech equipment, such as E.X.O. Suits, Spider Suits, Skulljack or experimental weapons. The Providing Ground is essentially like the Manufacturing from the previous X-Com games.
The Workshop allows you gain more Gremlin or Engineer usage. Upgrading it will allows you to have up to four engineers/Gremlins.
The Advanced Warfare Center allows players to retrain soldiers with new builds and skills. Staffing an Engineer or Gremlin in the room improves healing by 100%. It can also grant a random perk from a different class to a soldier for every promotion they get.
The Shadow Chamber allows XCOM to research more advanced alien technology. According to ChristopherOdd this is an essential room to have in your Avenger to progress the story and to gain a pre-mission upperhand on gaining useful intel before a mission starts. The Shadow Chamber is also great for showing you how many aliens are in an area and exactly what kind of alien types you’ll encounter on a mission.
The Defense Matrix allows you to take the turrets you scrap or destroy in the battlefield and repurpose them to defend against enemy attacks against the Avenger. Staffing an Engineer in the Defense Matrix to improve the turret defense mechanism. According to ChristopherOdd, it’s not an essential room to build until later on in the game.
Resistance Comms works as a satellite room to survey and gather data about the alien threats. This is a very essential room to have in order to thwart some enemy alien plans to prevent them from earning their win condition. Having at least two of the Resistance Comms will help with gathering data quickly and efficiently.
There’s also a breakdown of the skills for each of the character classes. It can get pretty lengthy but there’s a playlist covering the Rangers, Grenadiers, Sharpshooters, Specialists and Psi classes in the game. You can check out the video guides for each class below.
Now, when it comes to the battlefield that’s where things get can easily get hairy.
A lot of players are used to shooter games where you run out, aim down the sights and pull the trigger. In XCOM 2 there is a hit/miss roll-dice chance when firing weapons, and the objective is to raise that to-hit chance as high as possible. For Rangers and Sharpshooters, that means focusing on skills and weapon mods that will grant you the highest accuracy possible. For Grenadiers that means gaining access to heavy weapons that will do the most AOE splash damage. And for Specialists that means focusing on getting in and getting out without being seen as much as possible. Psi characters are practically cheats and so long as you focus on mind-controlling enemies you’re good to go.
Even still, there are some basic tactics to remember when going out on the battlefield: Overwatch is not always foolproof. The aliens can sometimes interrupt when setting up a scenario to stack Overwatch and take the aliens out by keeping your squad hidden and using a soldier as bait. Only rely on the bait-and-shoot tactic if you know for sure that either the soldier you’re using as bait is duly expendable, or you have enough contingency to ensure that they won’t die.
Additionally, the best option early on is to always play it safe. Don’t play any soldier as if they’re Rambo. Use a buddy system and ensure that any character class with short-range weapons is paired with a soldier with a long-range weapon, this way if a character who has to get close with a melee weapon they have someone to back them up if things don’t go as plan, or the situation gets real, real sour.
You can export characters you create and you can import character pools as well. You can create a number of characters and place them in the custom pools you make. So it’s possible to make a number of characters and then save them into a custom character pool. You can then exit the game and go into the XCOM2/XComGame/CharacterPool/Importable folder and you’ll find the pool files that contain the custom characters you’ve made. You can copy it and share it with friends online and they will be able to play with the custom characters you’ve created. ChristopherOdd explains how to share the character pools, import new characters into a pool, or export the characters.
Importing characters from someone else’s custom pool is pretty easy. Simply copy the pool file into the XCOM2/XComGame/CharacterPool/Importable folder.
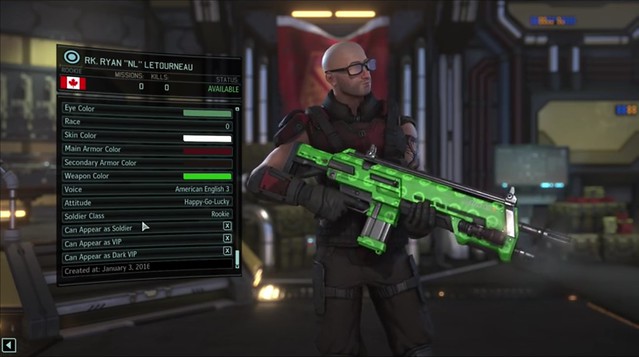
In order for characters to show up in the campaign mode you’ll need to enable that in the custom character options menu. At the very bottom you’ll see that the characters can show up as a Soldier, VIP or a Dark VIP. So long as those are checked, they’ll appear in the campaign mode in one of the designated roles. As a Soldier they can be recruited to your team. As a VIP you may have to rescue them or they will appear in the game as a scientist or engineer. As a Dark VIP they can appear as a character that you may have to assassinate or as a character you may have to track down and interrogate.
You may have to edit some initialization files to get the characters to forcibly show up in the game so that the game will pull data from the custom character pools you’ve either created or downloaded.
You’ll need to head into the directory XCOM2/XcomGame/Config/ and edit the XcomGameData.ini file.
If you don’t want any custom characters to appear in your XCOM 2 campaign you’ll want to edit the following strings to “RandomOnly”. If you only want custom characters, then switch it to “PoolOnly” to force the custom characters to show up in the game. Leaving it as “Mixed” will have random and custom characters show up in your campaign mode. Just replace the “eCPSM_Mixed” with “eCPSM_RandomOnly” or “eCPSM_PoolOnly” to make the desired change…
InitialSoldiersCharacterPoolSelectionMode=eCPSM_Mixed
RewardUnitCharacterPoolSelectionMode=eCPSM_Mixed
RecruitsCharacterPoolSelectionMode=eCPSM_Mixed
NumToRemoveFromSoldierDeck=10
XcomHeadquarters_NumToRemoveFromSoldierDeck=10
From there, you should be good to go and primed and ready to enjoy a nice, juicy round of XCOM 2.
The game is available right now, exclusively for PC.


