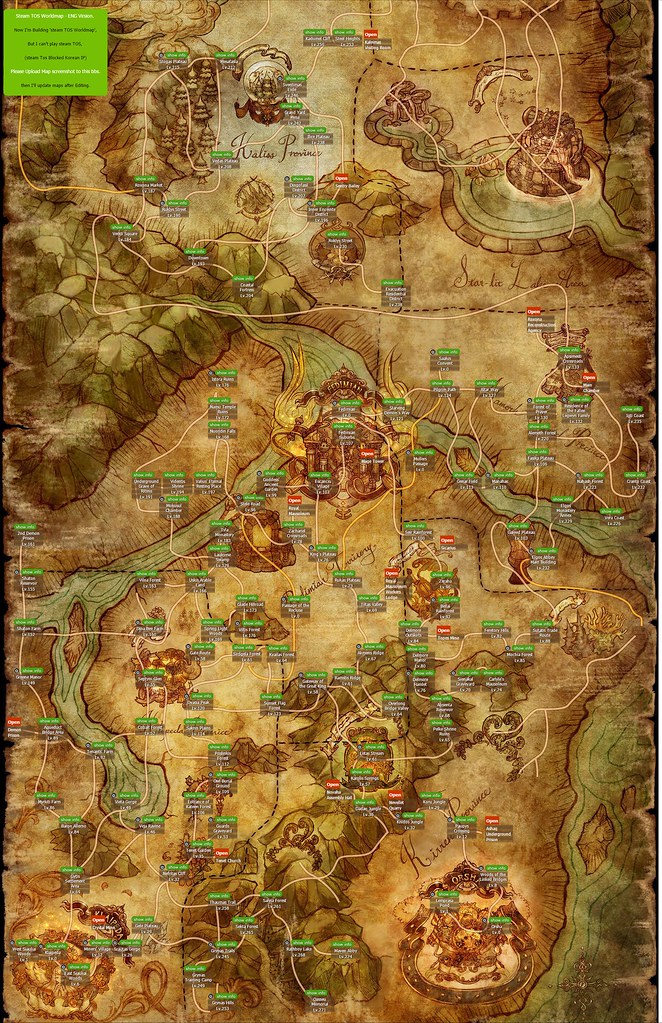
One of the major roadblocks in leveling in Tree of Savior is not being able to find where to quest next after reaching a certain level and running out of quests to do. Well, some gamers took the painstaking time to completely map out the level quests and where to go to obtain them by putting together a rather comprehensive quest guide using a giant map of Tree of Savior.
The map comes courtesy of Toscamp.com, where they have an English rendition of the layout so you can find each of the quest locations and for your specific character level. You can check out the map below.
Now in the other Tree of Savior leveling guides, between 1 through 100, and 100 through 200, they cover techniques you can use to blast through each level segment, as well as dealing with the grinding deadzones and when to pop EXP cards so you can maximize the growth of your character. However, those specific guides don’t quite cover the questing locations in a streamlined fashion.
But here, you can see in the map above that you’ll start questing at level 0 at either Orsha, Klaipeda, Saalus Convent, Passage of the Recluse, or Fedimian.
From each of those starting points you can then proceed through the level tiers all the way up to the mid game at Seir Rainforest at 100 if you started at Fedimian; the Crystal Mine Lot 2 if you started at Klaipeda; the Escanciu Village if you started at Orsha; Galeed Plateau at level 103, if you began at Saalus Convent; and the Goddess’ Ancient Garden if you began at the Passage of the Recluse.
Ultimately you get five main quest lines to pursue from the different areas if you follow the map guide above.
However, due to the way the leveling works in Tree of Savior, you may find yourself bouncing around between the five areas quite a bit. There’s no single one way to level up in the game, and as outlined in the 1 through 100 quest guide, if you want to level quickly and efficiently, you will need to travel between Orsha and Klaipeda frequently in order to compensate for the leveling deadzones, picking up quests outside of the region in which you started.
Also, take note that while the map shows where you should go for your quests, it does not offer you strategies on how to progress through the remainder of your levels after you’ve completed those quests. It’s best to use the map while also using a leveling guide so that you’ll know how to bounce between certain areas to make the most of leveling your character.
The quest guide only goes up to level 274 at the Maven Abby under the Fedimian line. The unfortunate part about it is that there are regional IP blocks in place so the English version of the map isn’t quite as complete as the Korean version.
Nevertheless, there have been plenty of guides, walkthroughs and tips sheets revealed to help gamers along the way with progressing and navigating through the minutiae of Tree of Savior.
The game is available right now as a free-to-play title, so you can check it out either on the official website or through the Steam store page.


