A lot of gamers are loving Axolot Games’ Scrap Mechanic. It’s an inventive piece of software that allows you to bring out your inner engineer. In a previous guide there was a walkthrough for making a basic ground-based, gas-powered vehicle. Well, there’s a new walkthrough guide available teaching gamers how to build a flying, transforming ship in Scrap Mechanic.
There’s a half hour video available from YouTuber Tango Tek who explains how to build a car and then turn it into a flying ship, from scratch. There’s a lengthy, step-by-step process that you can follow. Check it out in the video below.
As showcased above, you’ll need a driver seat, thrusters to propel the ship/car/vehicle forward, wheels to drive around on the ground, and vertical thrusters for vertical lift.
Just like in the last guide for Scrap Mechnic, you’ll need to start with the power lift. Place it down to start as your base. Tengo Tek uses wood as the material since it’s one of the lightest materials available in the game.
You will need a car driver seat after you place down a base chassis. You’ll next need to put a gas engine to place it on the back of the car and then put a switch next to the engine on one side and a button on the other side. The switch is for the transformation while the button is to activate the thrusters.
From there, add some sport suspension on the bottom of your chassis and then add a block and a bearing at the bottom for the rotation purpose. Once you add the blocks and the bearings you’ll need to add wheels. The bearings are so you can turn the front wheels left and right.
Next, you’ll need to build a housing over the gas engine and put a thruster on top of the gas engine. From there you will need to extend your suspension so you can add rear wheels. You don’t need bearings for steering control but you will need shocks and bearing so the wheels can rotate forward and backward.
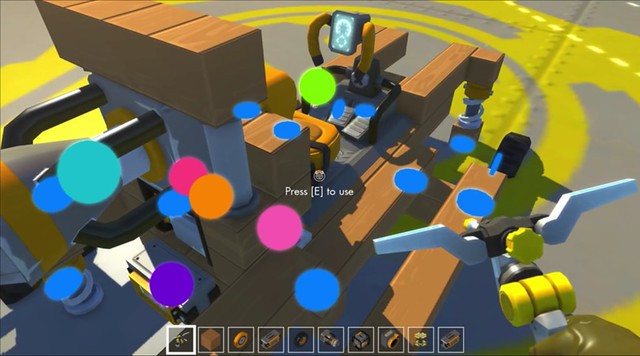
Next in the video, Tango explains how to add the transformation process. You will need to add a series of bearings on an extended housing on the side of the chassis on both the left and the right. You can see where you need to add the bearings and how the side extension needs to look with the image below.
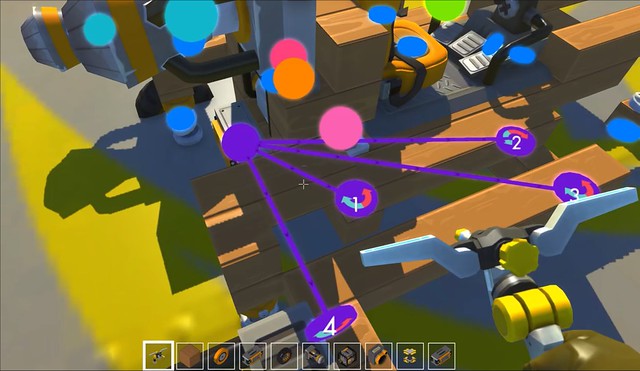
You’ll need to add a controller on the back of the vehicle for the transformation to be possible. This will require using the connectivity tool to connect all the bearings that will be used for transformation to the controller. It should look like in the picture below, ordered in the same way as you see in the image so that the side-structure on the chassis unfolds in a proper way.
From there, connect the button to the driver seat and the controller so that you’ll be able to turn on the thrusters. Then connect the switch – the one on the side of the gas engine – to the driver seat and the controller. This will allow you to activate the switch and begin the transformation for flying purposes.
You can hotkey both the button and switch so that you can use the numerical ‘1’ and numerical ‘2’ keys to activate the thrusters while the vehicle is in car form, and to transform the car into a flying ship.
So in practice, pressing the ‘1’ key will activate the thrusters while in car form. Pressing the ‘2’ key will transform the car into a flying ship. Pressing the ‘1’ key while the car is transformed into a ship will activate the thrusters.
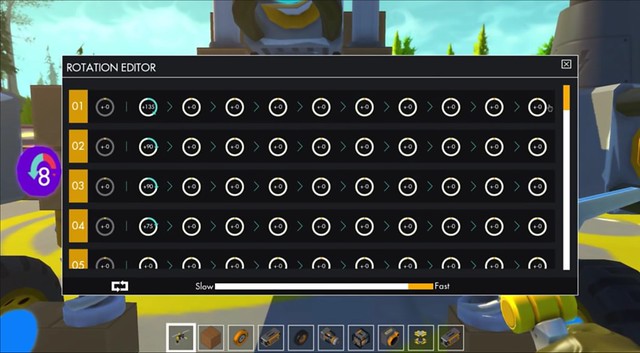
To setup the rotation of the wing transformation, you’ll need to head to the controller, press ‘E’ and setup the rotations using the rotation editor. You can use the image below to get an idea of how many degrees you’ll need add for the wings on both sides so that they extend properly. Tango used +135, +90, +90 and +75.
You’ll need to add a front controller for the front wings. In the video above Tango explains how to add the front wings and hook them up to the controller. And you’ll setup the rotation for each of the bearings on the front wings for both sides with +135 and +90 for the rest.
After you mess around with that that, connect the front controller to the rear transformation switch.
Proceed to then connect the gas engine to the four wheels so that they can move forward and backward. And then connect the steering wheel to the two bearings on the front of the vehicle so that you can turn the car left and right.
The gas-powered engine is for driving around normally, so you can move forward, backward and left and right.
Proceed to connect the thrusters to the button that’s mapped to the numerical ‘1’ key. This will make it so that every time you press ‘1’ you propel forward.
In the video above, Tango uses a third controller for two more thrusters on both the left and side of the vehicle. He uses the second column in the controller rotation editor to make the left and right front thrusters ever-so-slightly angled for forward propulsion. You need to set the second column to +60. The reason he uses the second column is because the controller uses sequential activation, so making the modification on the second column will activate the thrusters after the two side wings are activated.
It may seem a little confusing at first but following the instructions in the video and playing around with the tools in the game should make for some interesting results. But overall, that’s how you make a flying, transforming, ship/car hybrid.
Scrap Mechanic is available right now on Steam Early Access for $19.99. You can learn more by visiting Axolot Games’ official website for Scrap Mechanic.


