It’s not often that we have more than one walkthrough of a game here at One Angry Gamer but in this case Layers of Fear had an Early Access walkthrough but the game wasn’t finished at the time. Well, now it’s finished and there is a complete gameplay walkthrough available covering the game from start to finish for the Xbox One, PS4 and PC.
There’s a six video walkthrough courtesy of YouTube PS4Trophies, who walks through the game, the puzzles and the notes scattered throughout the horror game from Blooper Team.
In order to get into the locked room with the note on it, it directs you to head upstairs to the office. You’ll find the key on the desk of the office which is the room with painting over the chair just upstairs to the left.
Use the key to open the door on the first floor that leads into the painting room.
When you exit the room the house will change and lead you into another room. Proceed into the room and look around. When it’s time to exit the house will change again.
You’ll end up in another room with a locked chest. The combination for the chest appears when you turn on the lights. The code is: 854
A new door will appear in the middle of the wall opposite of the chest, enter through the door to get to a new hallway.
Majority of the progression is about looking at objects and reading notes littered throughout the house. Picking up and examining objects will help unlock new pathways or reveal more about the game’s story.
Once you get back into the kitchen you’ll need to attempt to open the door leading out; but it’s blocked. You’ll need to grab the flayed skin from out of the decrepit painting and head back into the painting room and open the cabinet to the right of the painting.
After you move through the hallway with all the locked doors, head back and one of the doors in the hallway will open, revealing a key on the desk.
Majority of the segments that follow are quite linear and will simply require walking through various doorways and hallways as the game guides you through the mansion.
You’ll eventually end up in a small study with a globe, some chairs and a mirror. You’ll have to walk through the mirror to progress to the next part – the image in the mirror that you stepped out of will distort into a grotesque display.
Proceed down the hallway after leaving the room and you’ll need to enter the room to your left after the painting with the dog deforms into a flesh beast. You’ll need to proceed through a few more hallways and deal with a few transforming rooms. You’ll eventually end up in a small room with a bed and a key on the desk. The door will lock behind you and you will hear some knocking on the door. Read the note in the drawer beside the bed to unlock the door and proceed to exit the room and go down the hallway to your right.
You’ll end up in a room with a phonograph on a table in the middle of the room. Grab the record in the room and place it on the phonograph. Wind it on the side until the room decomposes into the after effects of a fire. A bottle will roll out from under the bed. Grab the bottle. Flip the switch on the back of the phonograph and slow the play speed down by putting the switch in the middle. If you wind it up again the room will return to its former state before burning down. This will enable you to exit the room and bring the bottle back to the painter’s room.
The game sends you back through a series of hallways that eventually lead to a library. You’ll eventually get to a segment where you’ll end up in a loop. When you get to the loop you’ll need to turn around and counter-clockwise, going bacl the opposite way you came after you hear the voice speak on the phone. You’ll eventually end up on the lower floor where the the phone drops. After listening to the conversation, you can continue through the hallway until a room to your right will open up.
Continue through the house until you get to a spooky hallway that eventually leads to an elevator. Take the elevator down and follow the hallway to the bathroom with the floating doll in the tub. Take the rat drawing, head out of the room and grab the wooden pallet and move it out of the way to proceed through the hallway.
You’ll eventually end up in a storage room where you need to play the piano until gravity is defied by the room and the furniture begins to fly around. Wait for the song to end and then get the box with the bone in it and exit the storage room in the basement and head back upstairs. The door will take you back to the painter’s room where where the painting will evolve and the box will be added in the cabinet.
Exit the room and head down the hallway until you get to a room with children drawings. Proceed to move around the room until a door appears and exit to continue down more hallways and head into more rooms.
You’ll need to follow more rooms until you get to a room with some checker pieces on a table. Examine the pieces and proceed out of the room into the next segment. You’ll eventually end up in a very creepy room with a bunch of baby dolls. Examining the the room will cause the room to distort into a frightening display of pants-wetting moments involving the baby dolls.
Proceed through the dollhouse maze where more pants-wetting moments will ensue. Simply move through the hallways as the doll nightmare takes its course. There isn’t much to do here but experience the horror and let it ravage your sensibilities. Just let it happen.
Eventually the nightmare will end and you’ll end up in a white hallway with various doors. Enter into the room on the right to and grab the key from out of the desk next to the crib.
After messing with the music box in the center of the room and experiencing another horror segment, you’ll find the horse-hair brush in the crib.
The next item will require walking through a circular room that appears to lead no where. Start on your left and then turn around and start moving to the right. Follow more of the hallways and doors through the segments until you get to a point where you have to chase a rat into a paint supply room.
You’ll find that there is a piece of paper on the ground that has “Cat”, “Dog” and “Rat” on it. It has squiggly lines with each of the animal names corresponding to three numbers at the bottom of the page in the form of a maze. The paper puzzle corresponds with a combination lock that appears on the door behind you. The combination to get out of the store room is based on the image on the paper, which will either be a cat, dog or rat. So if it’s the cat it’s: 341.
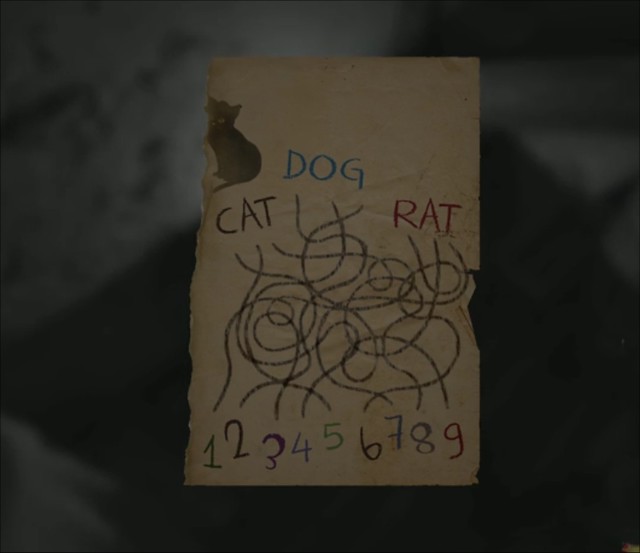
The numbers correspond with the “Cat”, as you would use a cat to chase a rat.
After getting out of the room you’ll need to travel to your left and and head through a few more rooms until you get to a segment where you’ll have to pass through various doorways similar to the entrance at the beginning.
Simply follow the hallway that leads to the destroyed study where there are a few items to explore, including a letter and a dog muzzle. Another pants-wetting segment will ensue and then it will be possible to leave the room.
After going through a few more rooms and hallways, you’ll end up at an elevator that will go up and then get stuck. A Grudge-style apparition will appear and the elevator will drop. You’ll end up in a room with a bunch of locked, gated doors. You won’t be able to open the doors but if you look up at the ceiling you’ll warp out of the locked elevator room.
There is another apparition segment that will result in the player character getting knocked out. You’ll eventually end up in the study again only this time there’s a ringing telephone and you’ll need to put in the proper number to proceed. You can use 911 to unlock an achievement/trophy but the proper number to progress is: 363
When you progress through the bookshelf where the secret phone is, there’s a second phone rigging along a ledge. Be careful not to fall. Wait for the bookshelf to fall over and it will reveal a new code. The number to the second phone is: 853
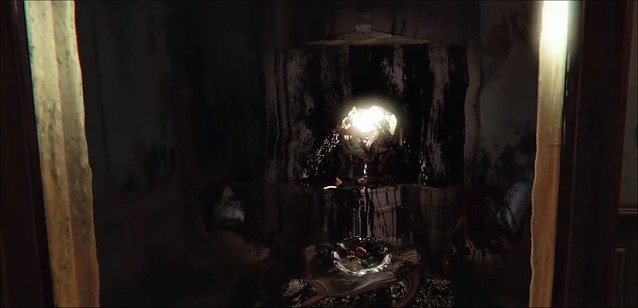
There’s a third phone but you can’t interact with it until you uncover the numbers. If you examine the ground where the floating light is and then look back up, the next set of numbers will be revealed, which is: 354
You’ll progress across some pallets hanging from chains on the ceiling until you fall. You’ll wake back up in the study where another phone will be ringing on the desk. Answer the phone. The phone will melt and a severed finger will be revealed. Exit the room with the severed finger.
Eventually you’ll move into another room where there’s a painting of a woman with a skinned rat face. After the painting falls down and you walk over them, the room will catch on fire and you can enter a hallway where a monster will come after you. You can exit the room and try another room. An apparition may attack you and you’ll wake up in the room. Exit the room and use the crank to bring up a collection of paintings before exiting the room.
After examining the room with the burning bed, proceed to exit and enter into another room where a Ouija board is sitting on the table. There’s a phone number in the drawer: 363 853. You can exit the room and proceed through the the hallways until you get to a room with a wheelchair and a lamp sitting in it.
You can head into the bathroom where examining the knife on the sink counter will trigger a cinematic. But the only way out is to dive into the tub a few times until you get out. Hold down the right trigger
while traveling through the alternate tub world until you can pick up the eye in the glass jar sitting in the tub, which will then allow you to exit the bathroom.
In the next room you’ll need to look at the bullet-time checker pieces floating in the air and then move around the room until a crib with a dead rat appears in the corner of the room. Find the checker pieces in each new part of the house that opens up.
Continue to move around the room to keep triggering events as the house opens up. Find the checker pieces in each new segment within the confines of the distorted room. After finding the piece in the nursery, there’s a small staircase where another checker piece is located at the top of the staircase.

Head back down and interact with the checkerboard again and the kitchen will open up. On the scale there is another checker piece. In the kitchen in the far right corner of the room, there is an oven that you can open. Inside is a bottle. Take the bottle out and place it on the scale. This will trigger a new event within the room with the checkerboard where another part of the room will open up. Interact with the checkerboard in the center of the room to trigger the next event, which should lead you back to the painting room where the painting can be completed.
After the sequence plays with the wife’s portrait turning into a decayed corpse, it will transfer the player back into the upstairs hallway. There’s a key on the desk in the study, just like before. Grab the key and head out of the room. There’s a neat sketchbook on the floor with the credits in it, if you want to see an awesome interactive credits sequence worth checking out.
You can take the key back down to the painting room and there will be another easel with a draping over it. Taking the drape off the easel will end the game and cue the proper and final credit sequence.
If you don’t already have a copy of the game, Layers of Fear is available right now for the PS4, Xbox One and PC.